Digital Image Processing
…The Craft & Creative Advantages of a Non-Destructive Workflow
~~~~~~~~~~~~The goal, after reading this article, is that you will strongly consider processing your digital photographs in
~~~~~~~~~~~~a “non-destructive” workflow to achieve your “Artistic Vision”.
The Limitations of Film Processing
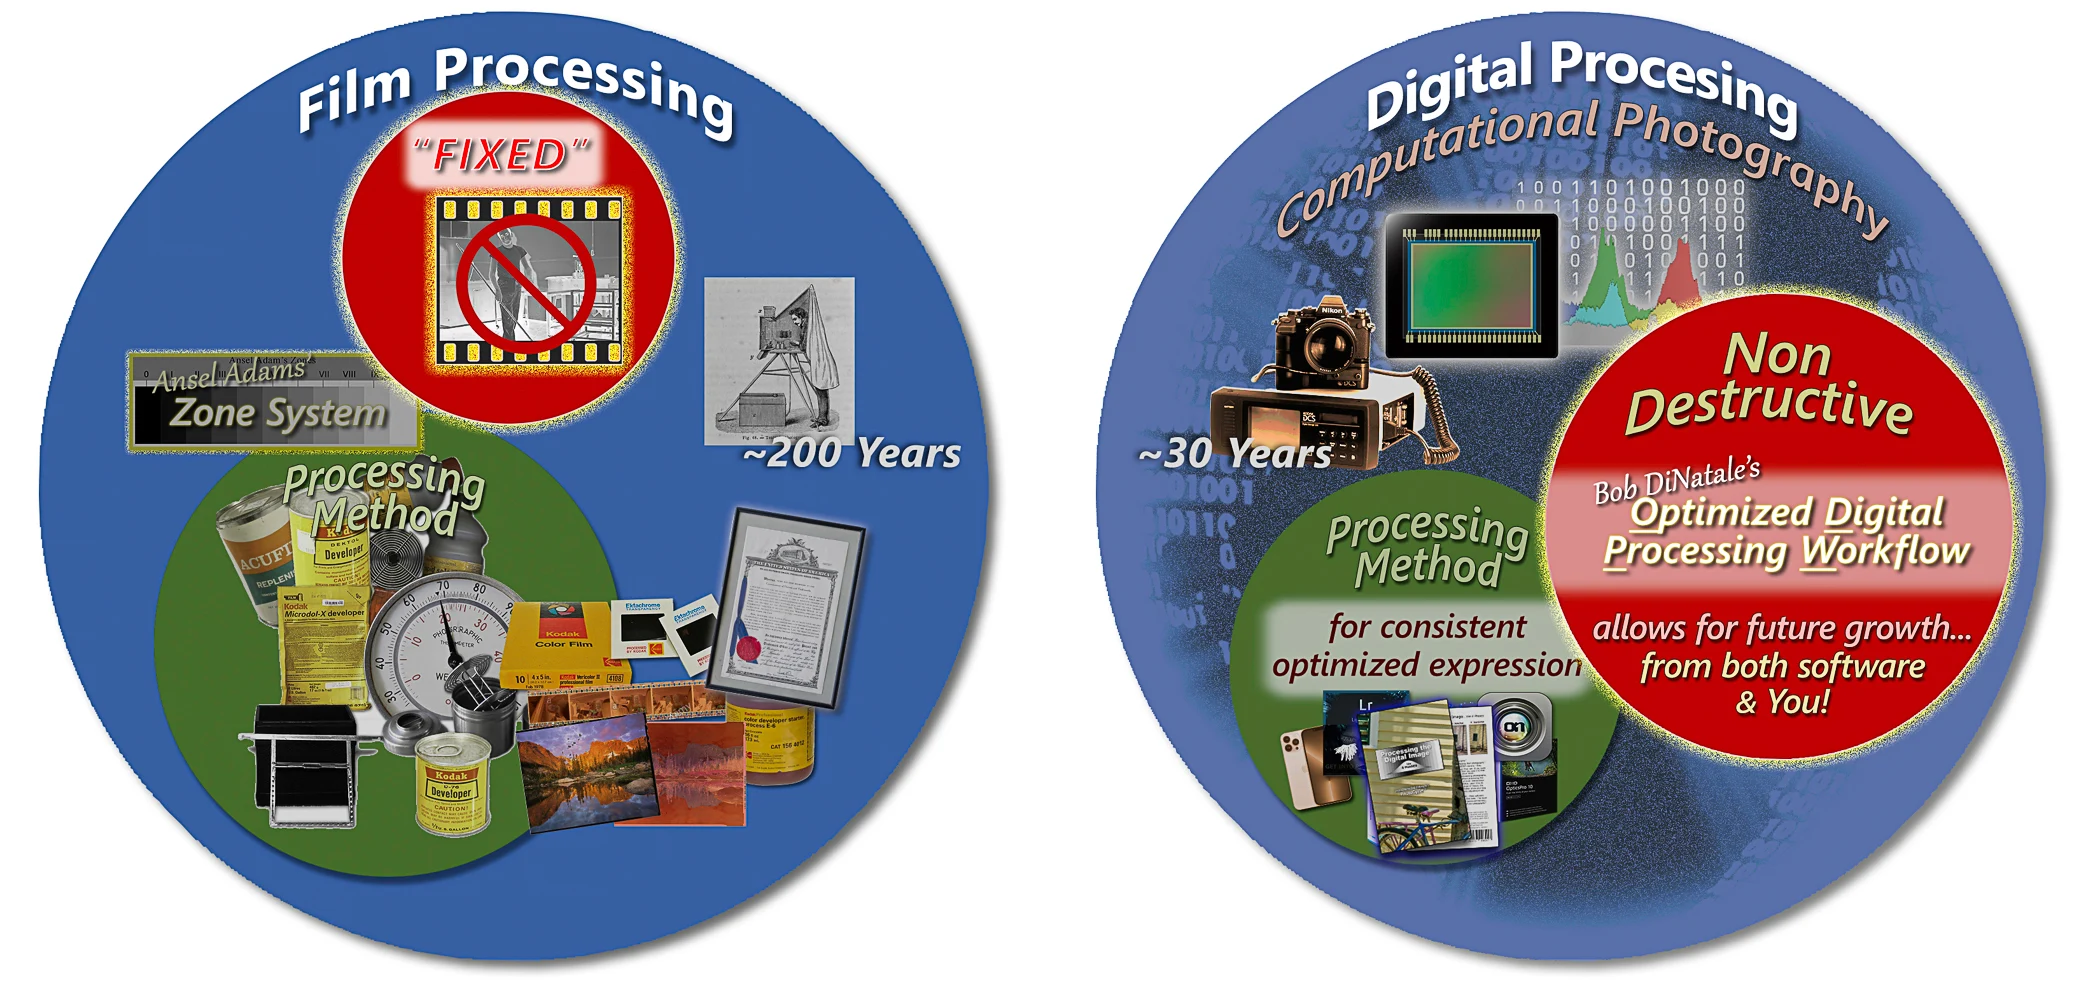
With all the advancements in the 200+ years of film photography, there has been only one enduring processing method… Ansel Adams’ Zone System. His technique provided the “Photographer/Processor” a “systematic” approach using film exposure and chemical processing to control tonal brightness ranges (Zones) in the print.
A serious limitation in film processing is that it is an irreversible “FIXED” process. There are no opportunities for revisions. Once the latent image is developed into a silver image – it is altered only by fading and aging that are beyond our control.
The Ansel Adams’ Zone System remains an effective system for film photography, but it is limited in its use to the digital “Photographer/Processor”.
A Digital Revolution
At its inception, digital processing was also a limited process… the camera-captured data was converted into pixels (rasterized). Although we could change these pixel values to “change the image” – the process was destructive.
With the advent of raw processing software (Adobe Camera Raw – 2003), digital image processing began what I see as Digital Photography’s 2nd Revolution.
Raw processing affords us the unique opportunity for non-destructive image editing. Using raw processing software, you can make edits to a digital photo without permanently altering the original data.
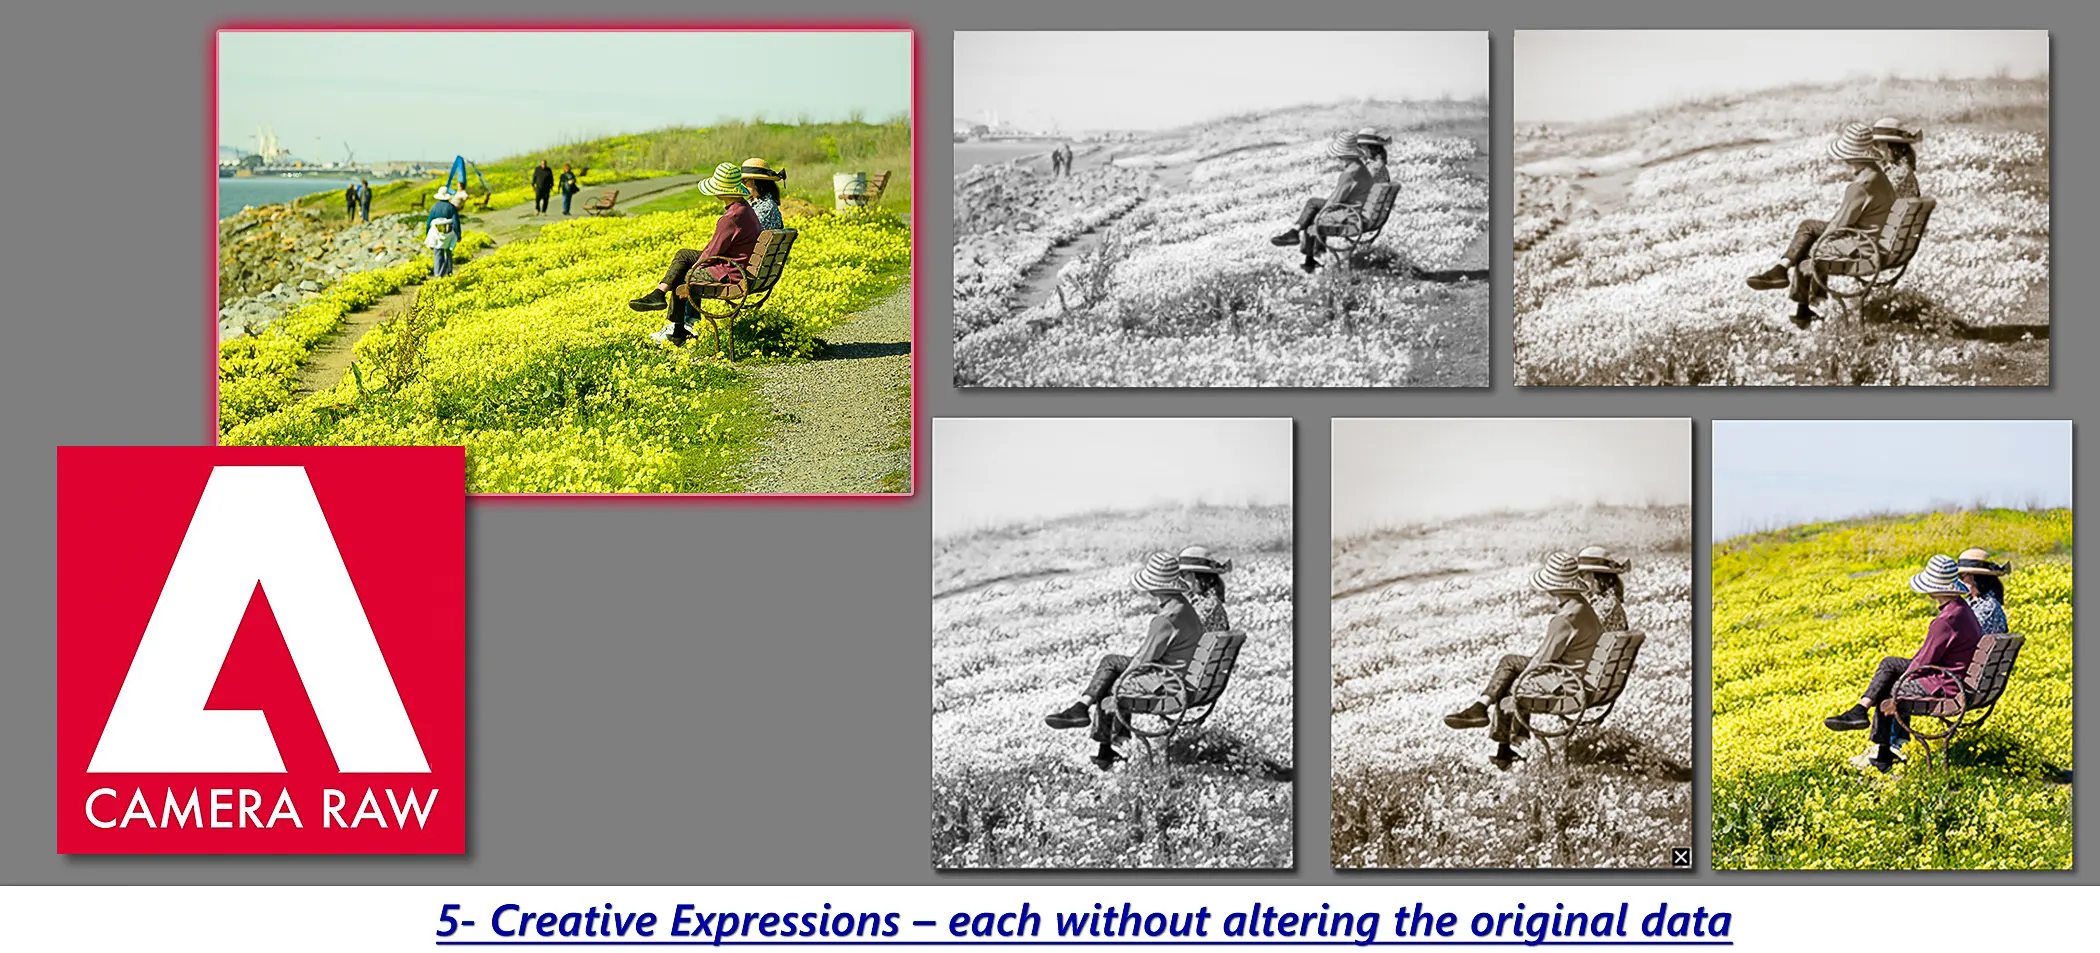
Raw processing software supports photo editing in a manner with distinct and reversible steps to reach the desired “Artist’s Vision”. More importantly, such processing allows us to take advantage of advancements in software and the growth of our processing skills.
What Is Digital Processing
Image processing tools available to today’s digital photographers did not exist 20 years ago, or 10 years ago… or even 1 year ago!
Digital Processing Software
Although Adobe dominates the world of digital processing with Photoshop and Lightroom, we each have our favorite software (e.g., Capture One, On1, DxO). We need to think beyond such favorite software and consider digital processing as Computational Photography. Unlike film, we process digital images with a series of instructions (algorithms) – not chemicals.
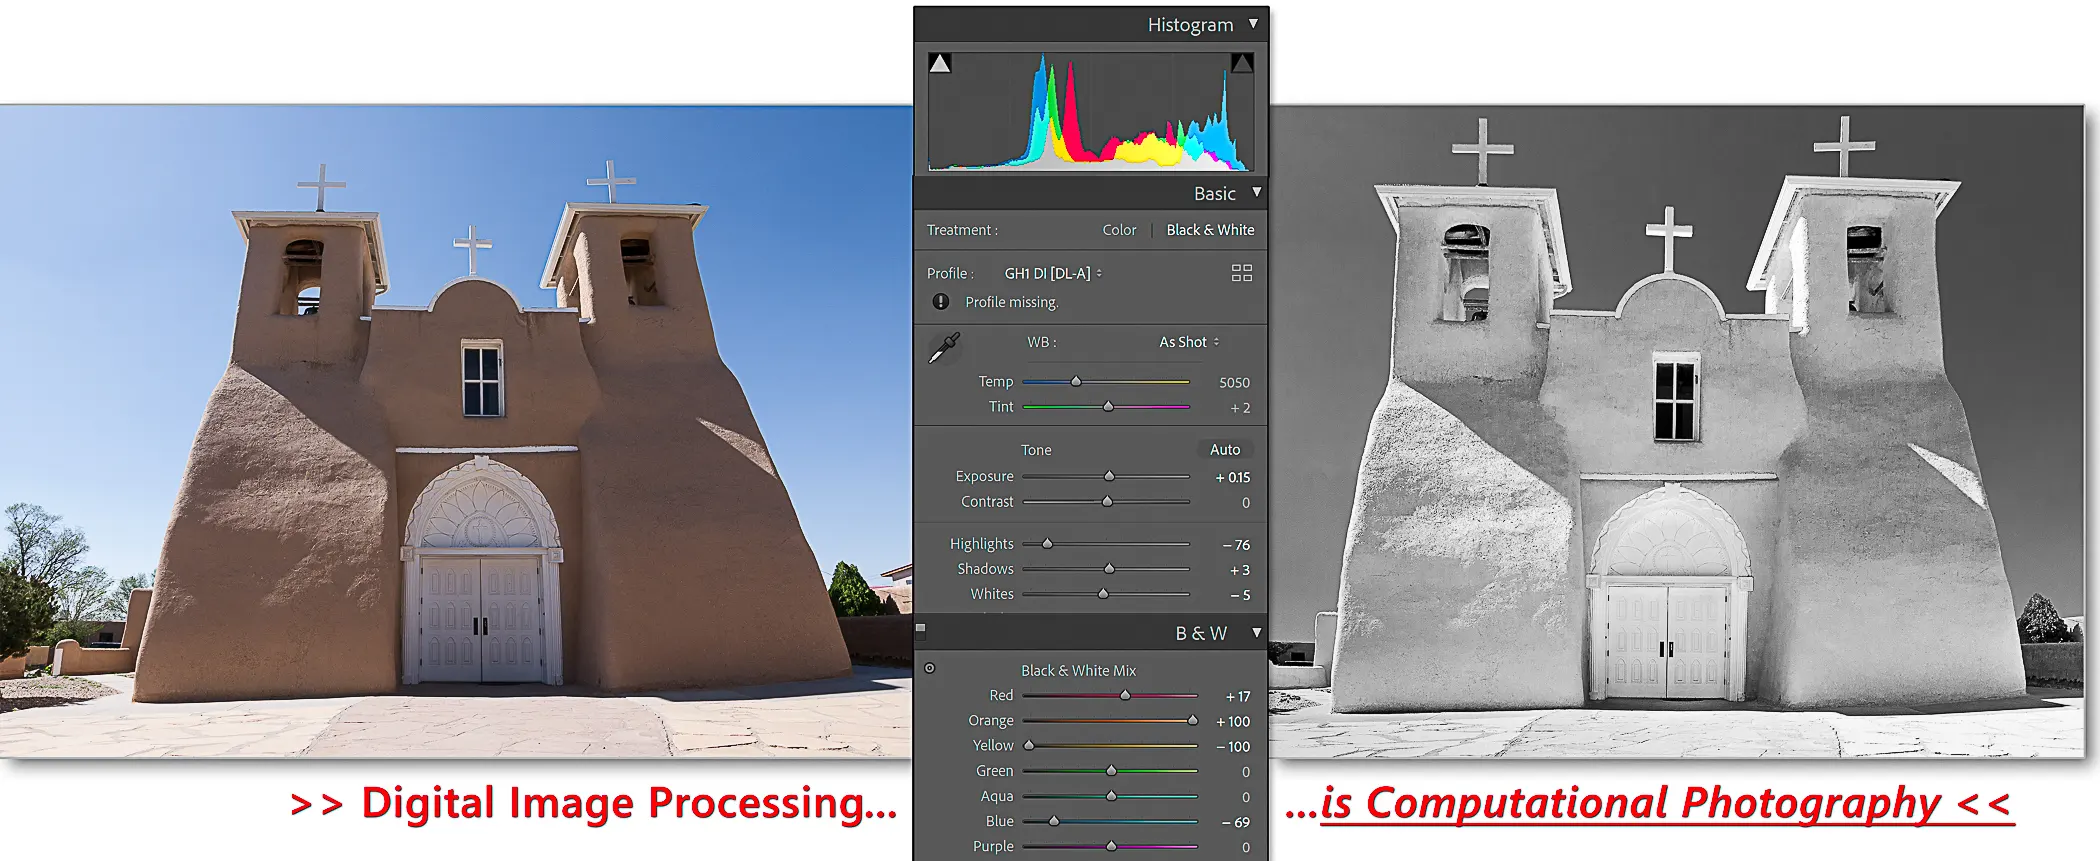
No matter what digital processing software we use, they all perform the same task. The software translates the camera-captured scene’s tonal data to the desired tonal output data… the “Photographer/ Processor’s” Artistic Vision.
In some ways, this tonal translation – from capture data to output data is similar to Ansel Adams’ Zone System. He would meter the scene, then expose the film to place the darker tones/zones. Then, through chemical processing, Adams would develop the film to place the bright tones/zones as he had pre-visualized. We can only imagine how he would systemize Computational Photography – my bet is that he would incorporate a non-destructive workflow!
[A Note on Pre/Post-Visualization]
** Post-visualization is a major creative aspect unique to digital image processing **
With digital photography, we do not need to pre-visualize our tones as Adams did… but we do post-visualize. With digital capture, there is no need to critically place our final tones at image capture. The “Photographer/Processor” just needs to optimize the digital capture (i.e., capture as much scene data without overexposing) and then, bring that optimized data into our digital raw processing software. (see my PhotoPXL article on The Optimum Digital Exposure).
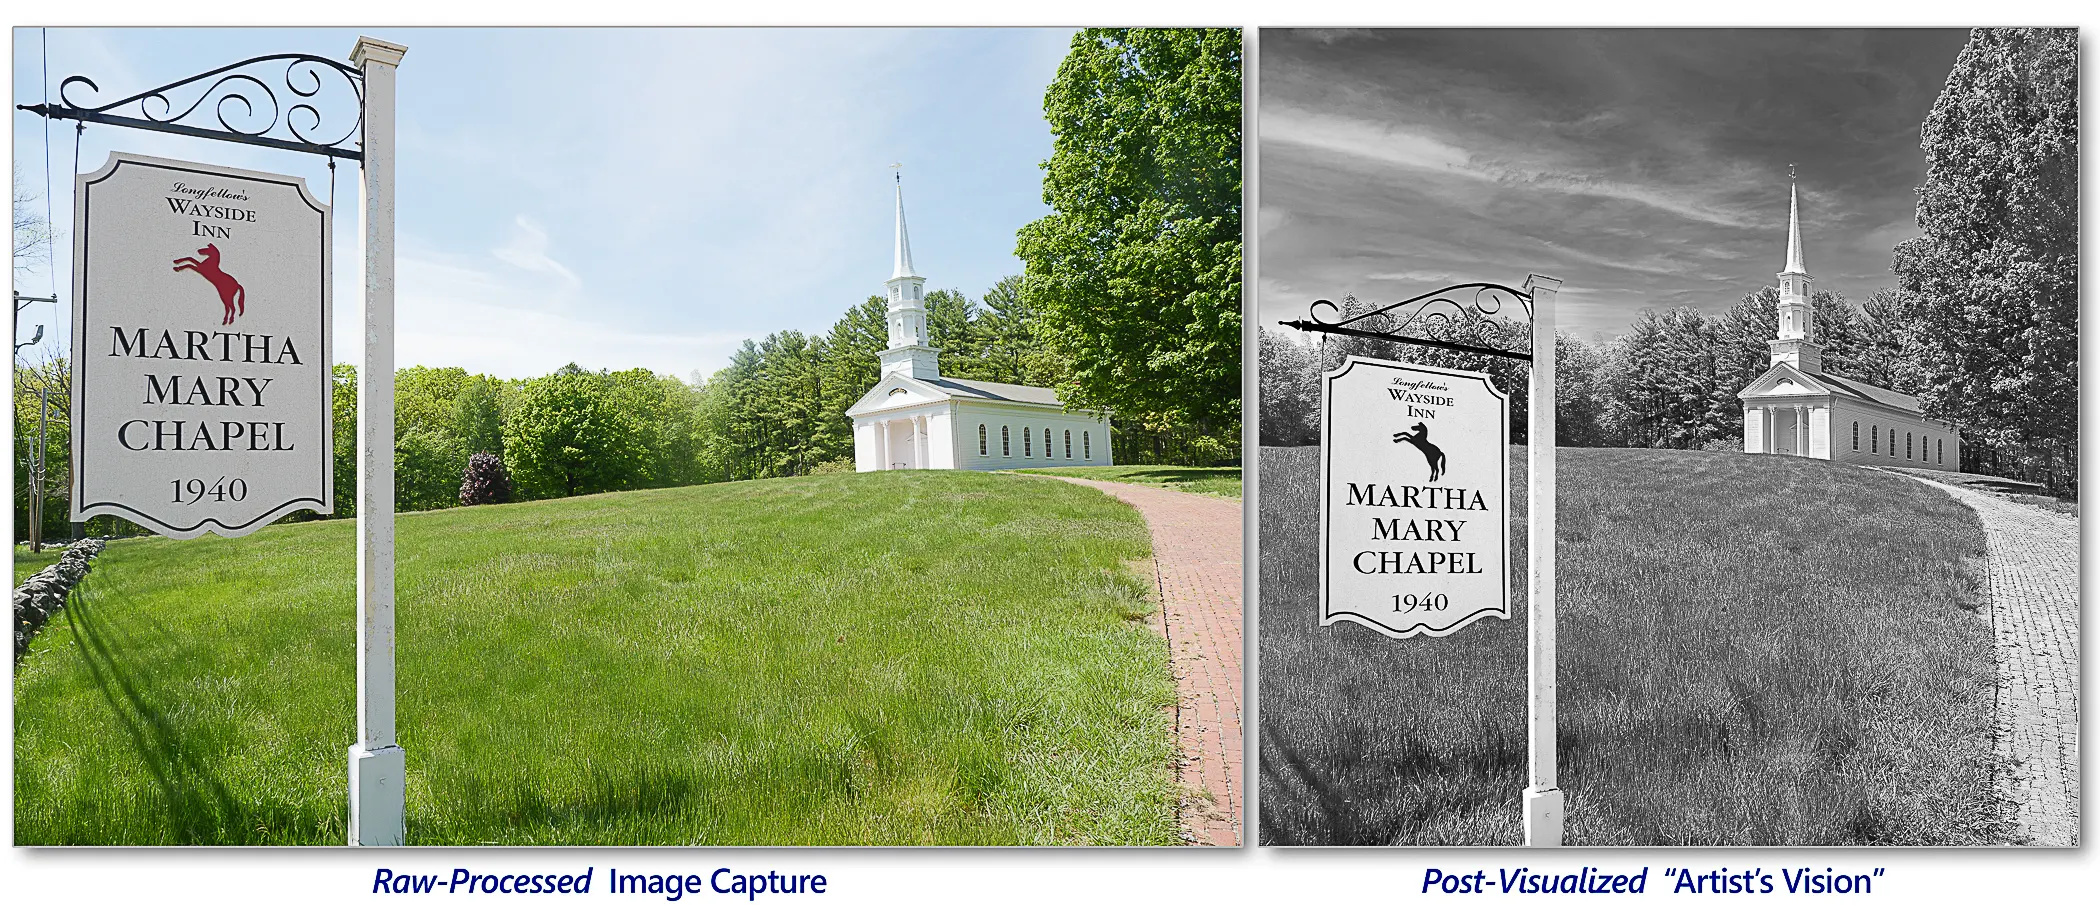
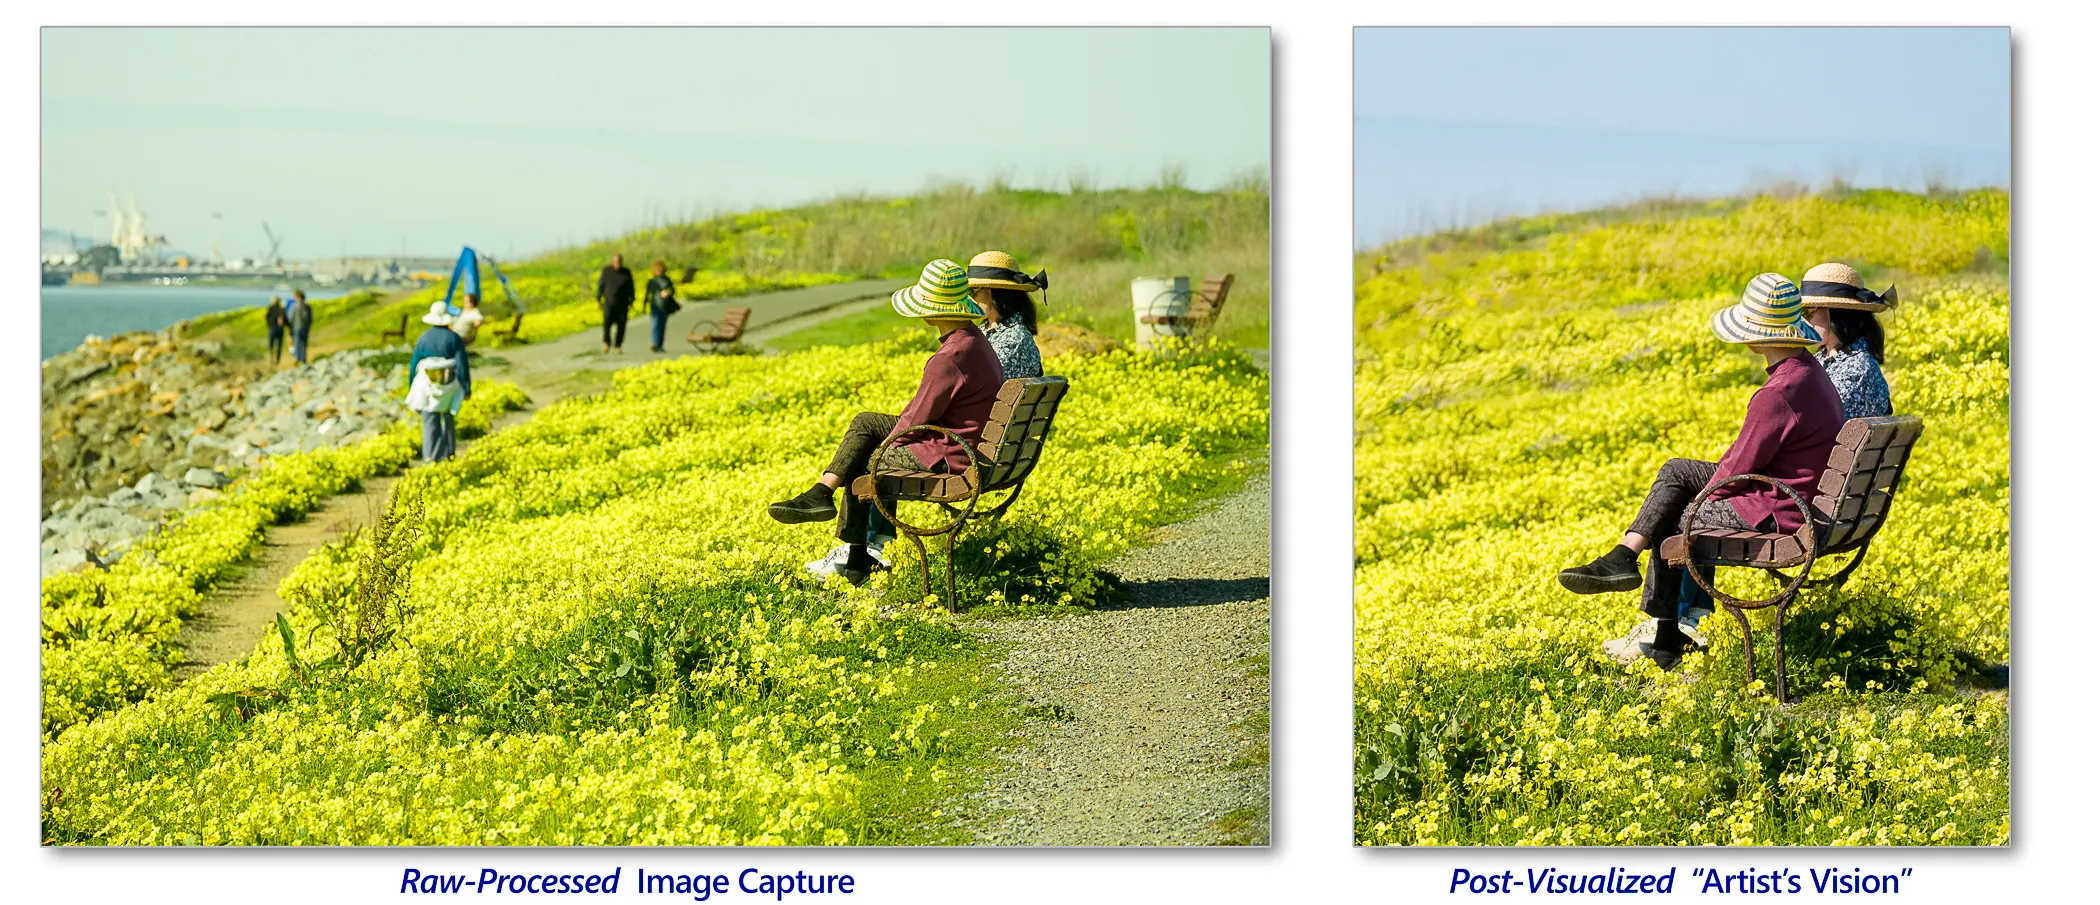
…Simply stated, digital processing is the translation of our scene-captured data to our desired output data.
“It is this translation… that makes photography an art rather than science.”
Karl Lang’s: “Rendering the Print: the Art of Photography”
…Let’s take a closer look into the Craft & Creativity of “Non-Destructive” Processing…
Real-World Advantages to “Non-Destructive” Processing
I captured this “Sicilian Bride” photograph in 2005 with my “brand new” 8-megapixel Olympus E300 DSLR… camera technology has certainly evolved!
This raw digital image capture was initially processed with Adobe Camera Raw – Process Version 1 (“ACR-PV1”). Over the years, I have reprocessed this image multiple times: in 2013 with ACR-PV3; then reprocessed again just a few months ago with ACR-PV5 – while also applying Topaz Labs DeNoise AI and Sharpen AI enhancements… Note: Some of these Topaz algorithms were not available 6 months prior to this writing!
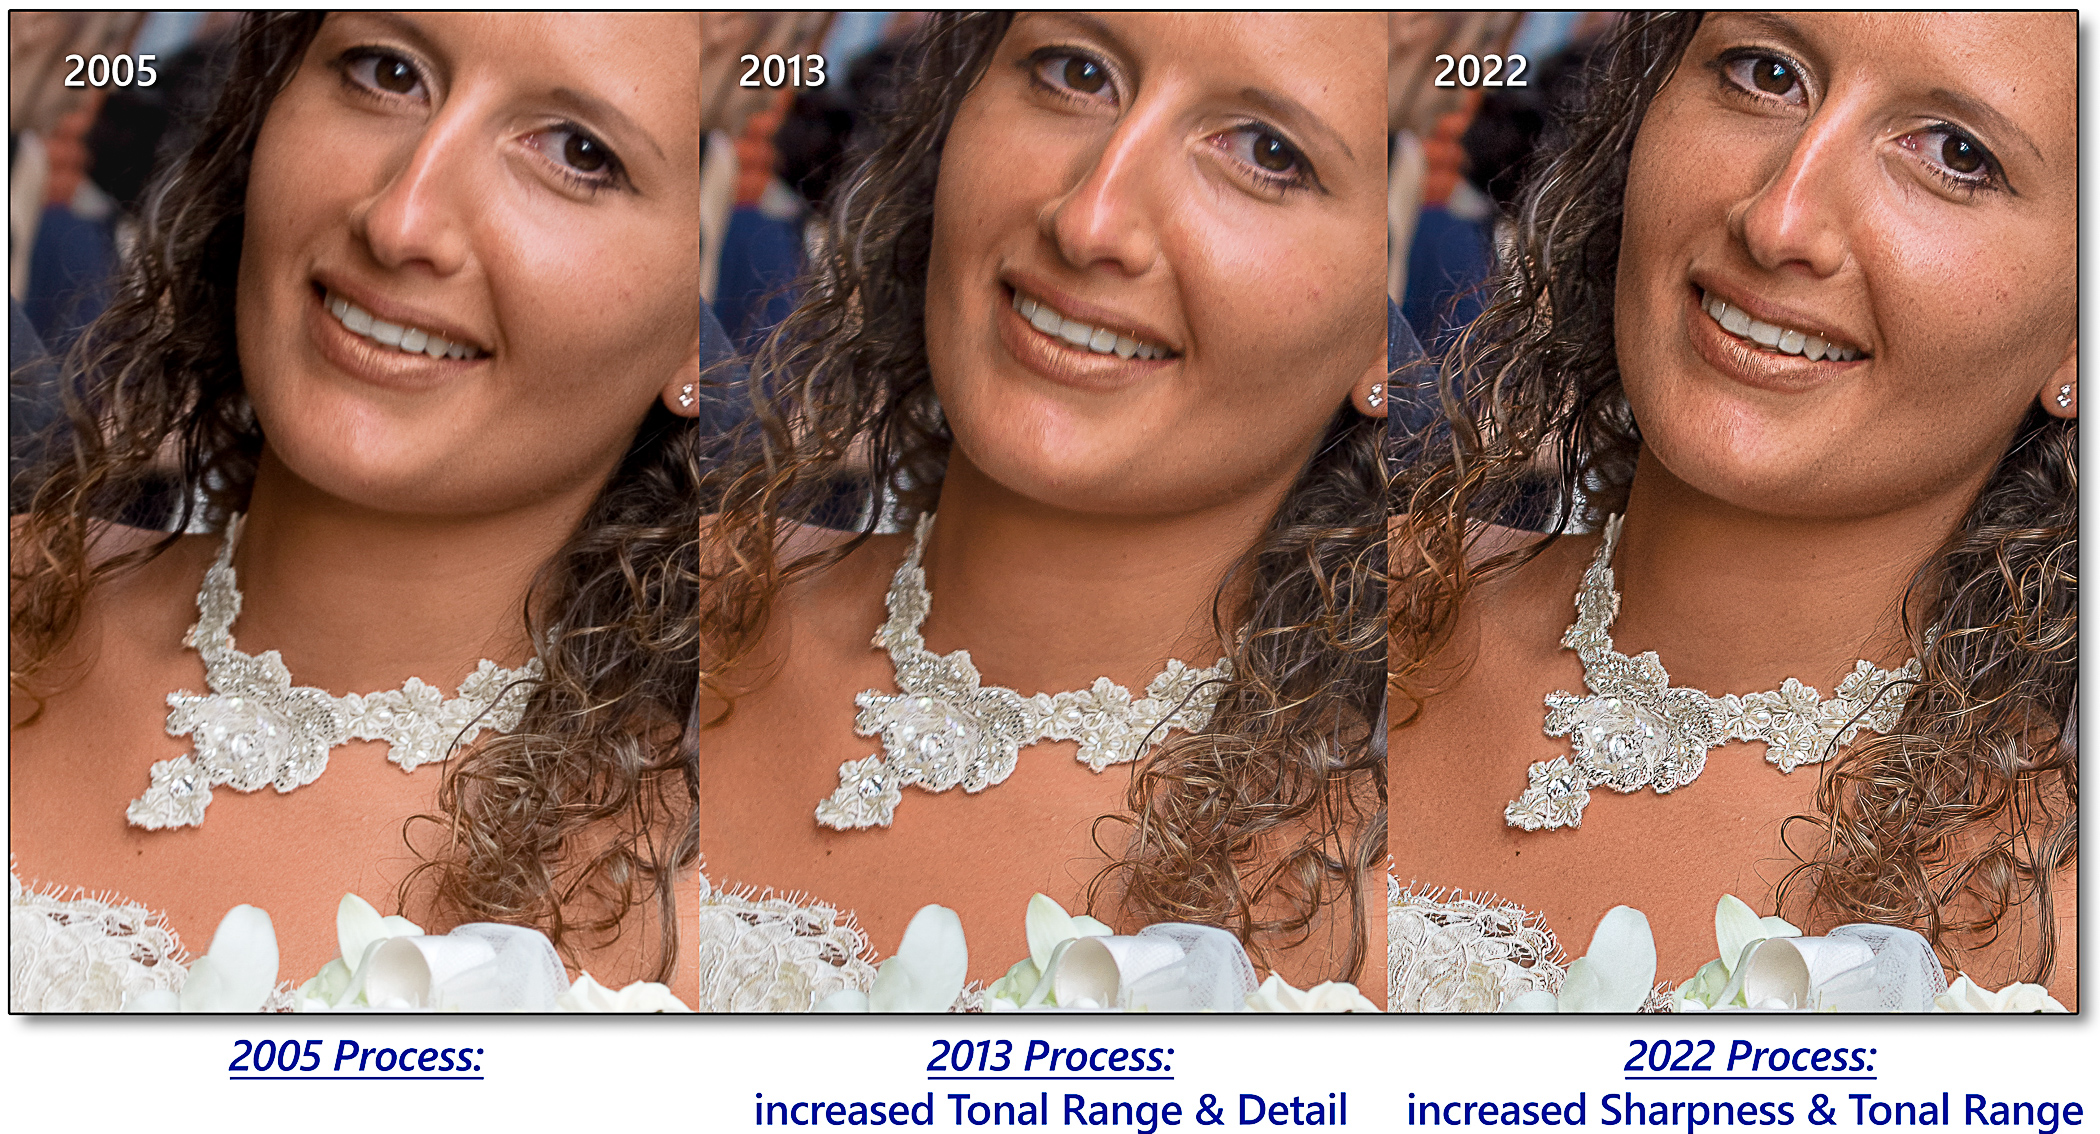
These iterative image refinements were possible as a result of non-destructive image processing… preserving the originally-captured data.
However, software algorithms… and my processing expertise have both evolved!
These iterative image refinements were possible as a result of non-destructive image processing… preserving the originally captured-data.
We know that software algorithms will continue to improve – as will our processing skills. We would be remiss to disregard the unique non-destructive benefits of our digital raw-image processing.
“Non-Destructive” Processing Keeps the Future Open
Processing our raw captured images with raw processing software preserves the original data that we captured when the camera’s shutter was released. It is important that we process “non-destructively” to preserve our original raw data captured at the scene.
We can continue our “non-destructive” processing in Photoshop using tools such as Smart Objects, Smart Filters, Adjustment Layers, Luminosity Masks, etc.
A non-destructive workflow future-proofs our craft and creativity as advancements in digital image software expand our possibilities. Maintain a non-destructive process for as long as possible throughout your workflow.
#1: A Study in Blue
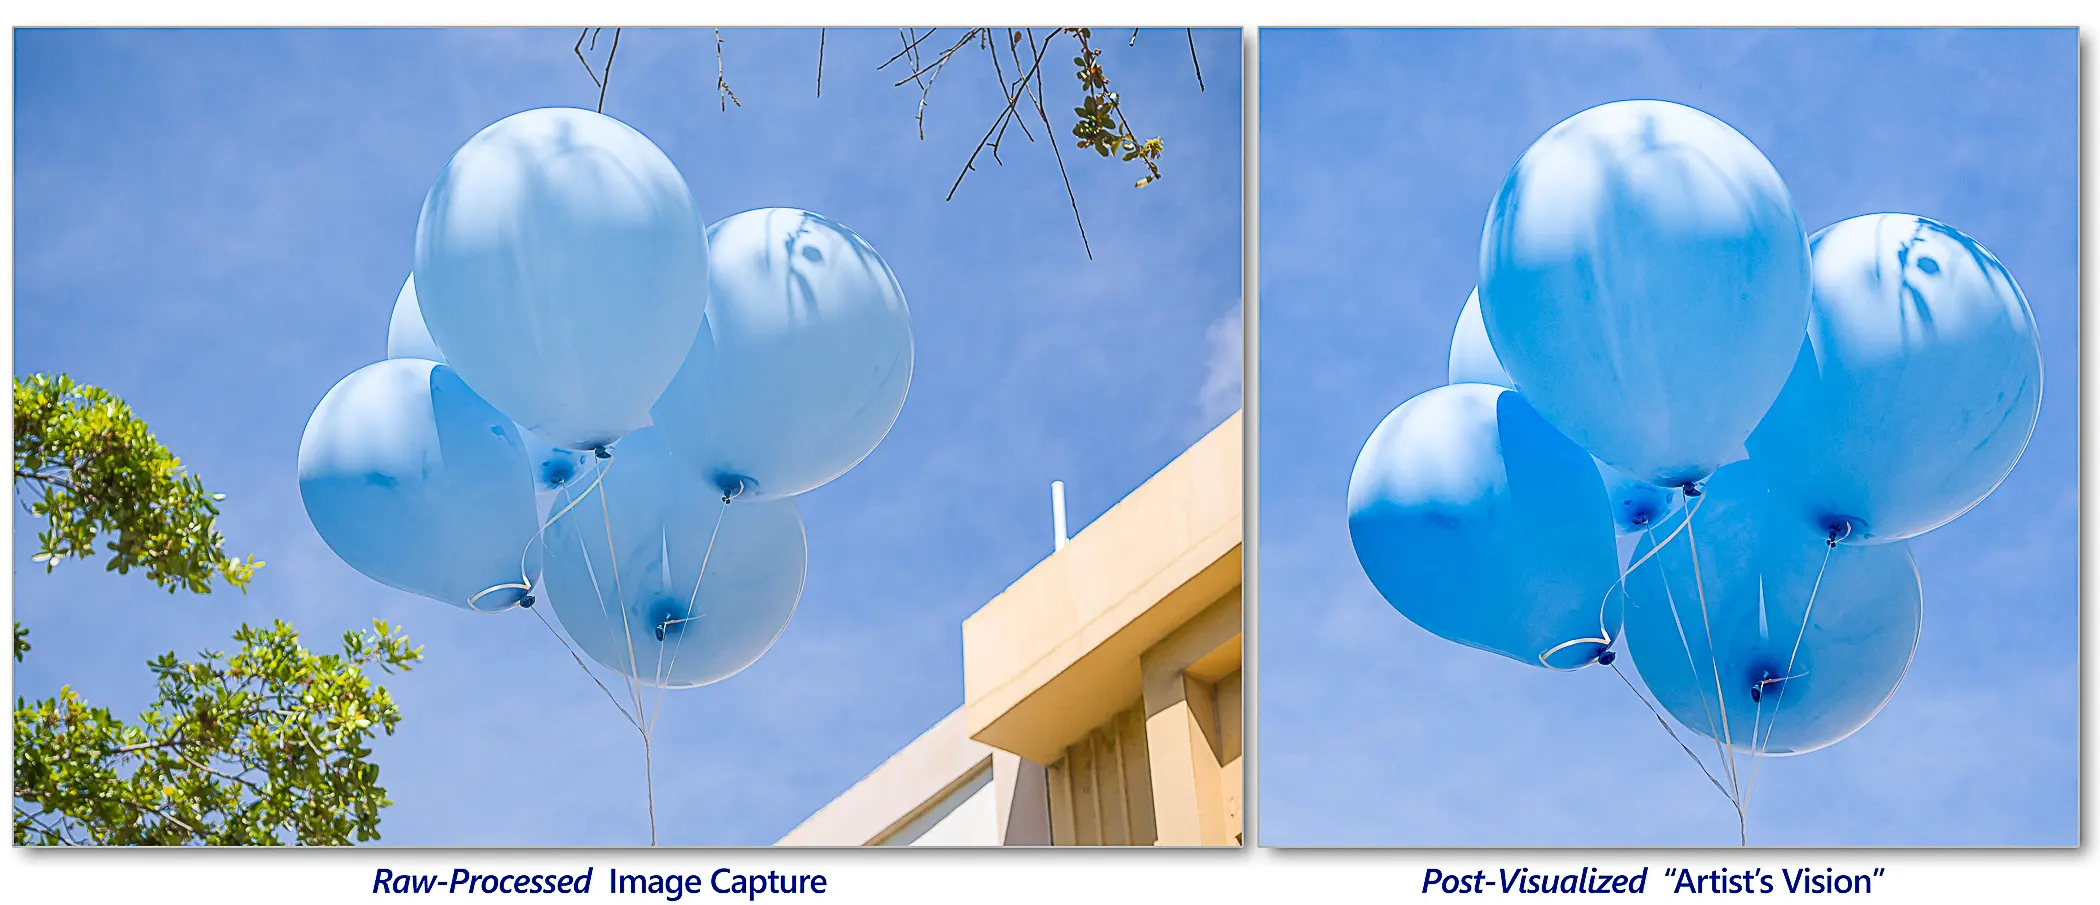
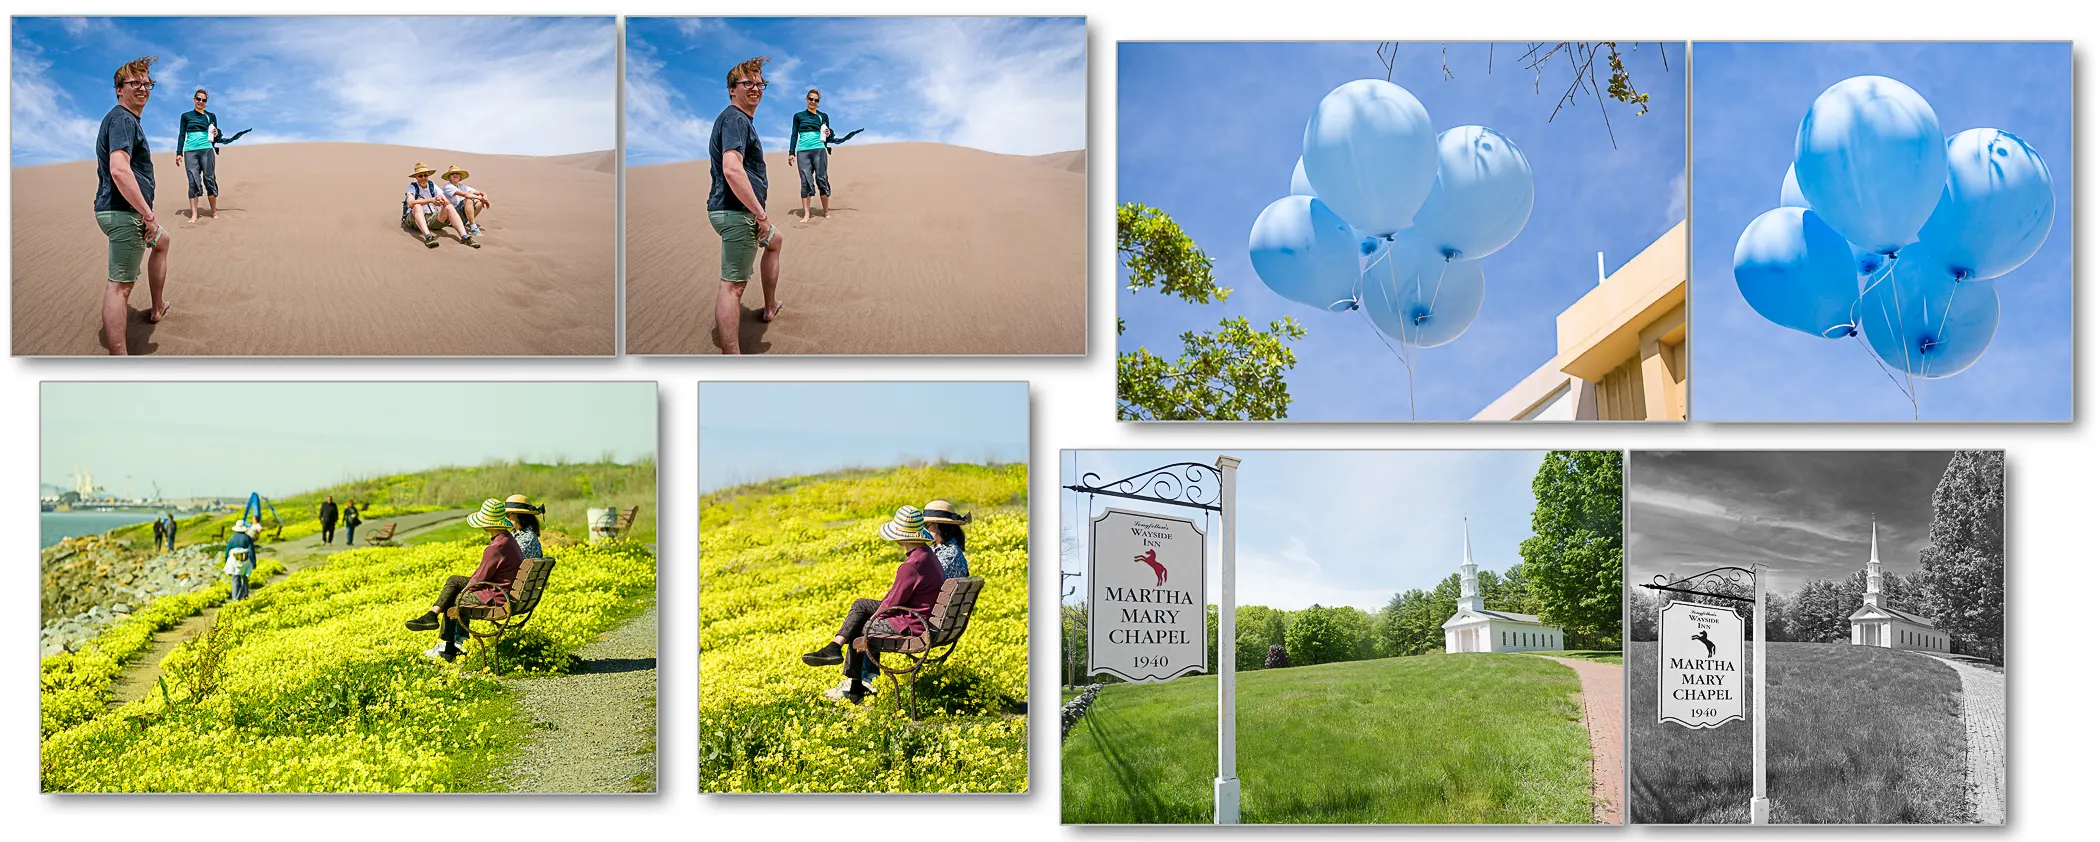
This monochrome scene of blue balloons against the complementary blue sky caught my eye while walking down the colorful Atlantic Avenue, Delray Beach, Florida. It reminded me of something I wrote many years ago: “as things become more similar, their differences become more apparent”. My “artistic vision” was to – create a “study in blue”.
A “Photographer/Processor” using a Non-Destructive workflow…
To accomplish these “contrasts in blue similarities”, I needed to remove the distractions of the tree branches, the building and then balance the brightness and hue of blue tones to guide the viewer’s focus.
Enter Artificial Intelligence
If you were using Photoshop in the years between the late 1990s and the early 2010s, I hope you have kept up with its numerous changes. No photo editing software has evolved more than Photoshop with its many new features. Along with the advent of Artificial Intelligence (AI), PS has many features supporting non-destructive processing. However, there are some powerful AI features that do not work with non-destructive editing… Sometimes you may need to leave the non-destructive world to incorporate some of Photoshop’s AI features.
#2: And Who Are Those Strangers?
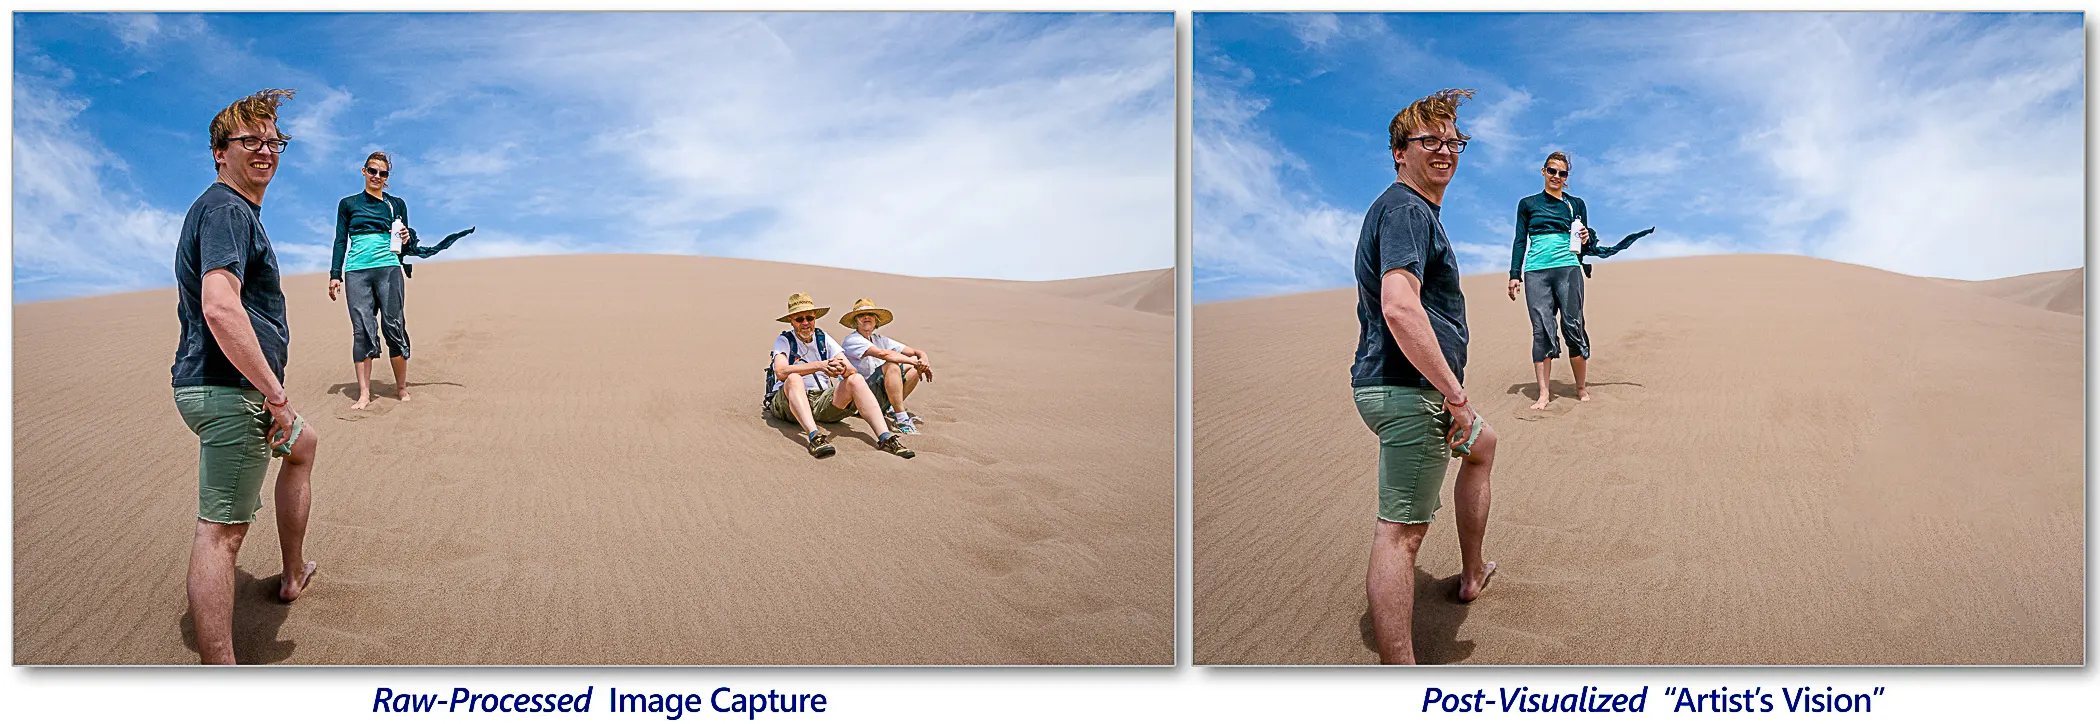
On a trip to White Sands National Park in New Mexico, our family tried hiking over the dunes. Most of us had to rest periodically, as did the strangers sitting in the sand – but not so our Justin and Ellen. My “artistic vision” was – to remove the strangers!
A “Photographer/Processor” using a Non-Destructive workflow…
To accomplish this vision, I needed to remove the strangers seated in the sand. I would then consider modifying the 16:9 capture ratio to address the unbalanced composition created by the removal of the strangers…
Enter Photoshop’s AI: Content-Aware Fill (CAF) and Content-Aware Scale (CAS).
> using the CAF feature to remove the strangers and then,
> using the CAS feature to move the right side of the frame towards the left…
—…without distorting Justin or Ellen!
Real-World Digital Processing – “Today”
Below are two examples of a non-destructive digital processing workflow that, until recently, were unavailable to the digital “Photographer/Processor”.
Example 1: Camera Movement and Severe Noise
In 2005, I had the opportunity to attend a small gathering of about 200 futurists photographers in Ann Arbor Michigan, the home of Thomas Knoll …the father of Photoshop. The gathering was a fundraiser for a gifted children’s school. A number of the attendees were “friends of Thomas” (a.k.a. the Grand Masters of Photoshop: Bruce Frasier, Jeff Schewe, Mark Hamburg, Scott Kelby to name a few).
Little did I know that what I experienced that week would be the seeds of this article – and my path to “Non-Destructive” digital image processing.
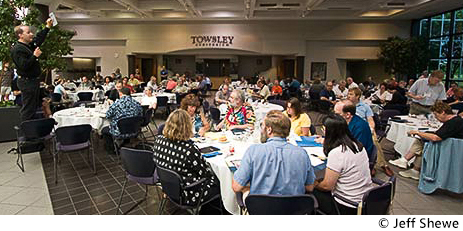
Opportunity to Photograph a Legend
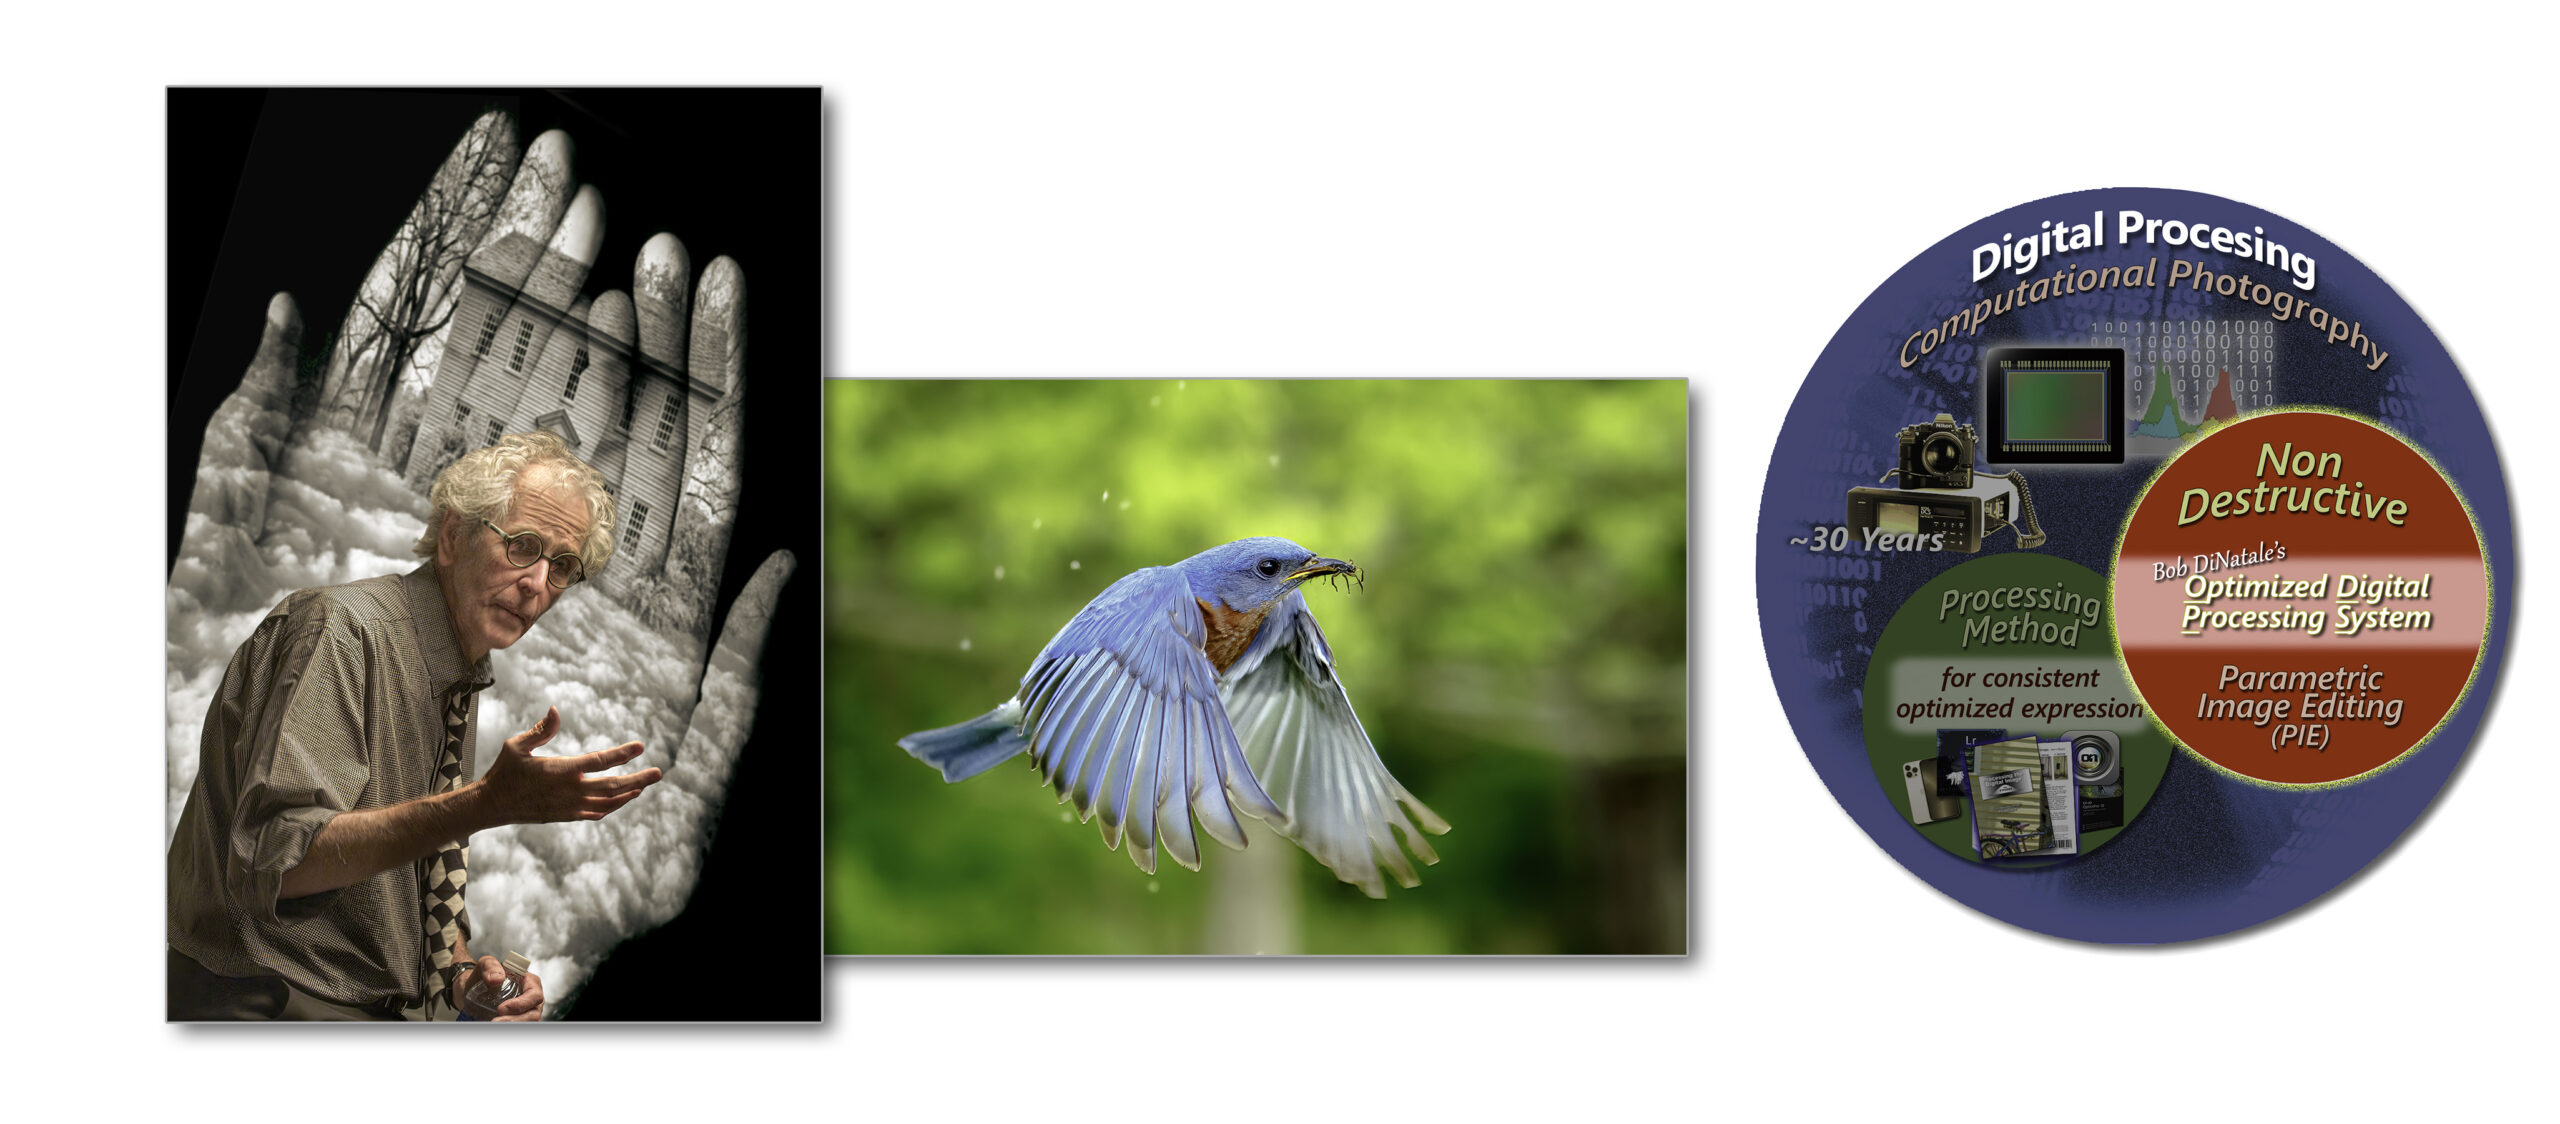
One of the more intriguing speakers was photographer Jerry Uelsmann, a pioneer in black-and-white photo composites – a true photography innovator whose photos are legendary. His work continues to mystify viewers.

Jerry was invited to speak at this Photoshop workshop because of his “Photoshop-like” images… even though he created his images some 30 years before Photoshop was a twinkle in Thomas Knoll’s eye! Today, many still mistakenly think of Jerry as the grandfather of Photoshop… as he joked, “I never touched the program!”.
Seeds of Non-Destructive Processing
My photographs of Jerry were taken in 2005 when camera raw, and Non-Destructive processing, were in their infancy… although that was all new to me at that time.
What wasn’t new to me, as a photographer, were the limitations of a difficult shooting situation – projected slides in a darkened room. I waited for the Q&A session when the room lights were on but the photo environment was still far from desirable

My series of exposures had some good gestures, and some had decent lighting… but the drama of the darkened room and his projections were lost. The results of my shoot were, as expected, very noisy soft images due to slow shutter speeds and/or camera movement. (See close-ups of raw captures from inset below)

#3: Restoring a “Soft & Noisy” Decisive Moment
Let’s fast-forward to today… With the significant advancements of Non-Destructive processing: artificial intelligence; image sharpening and noise reduction algorithms.
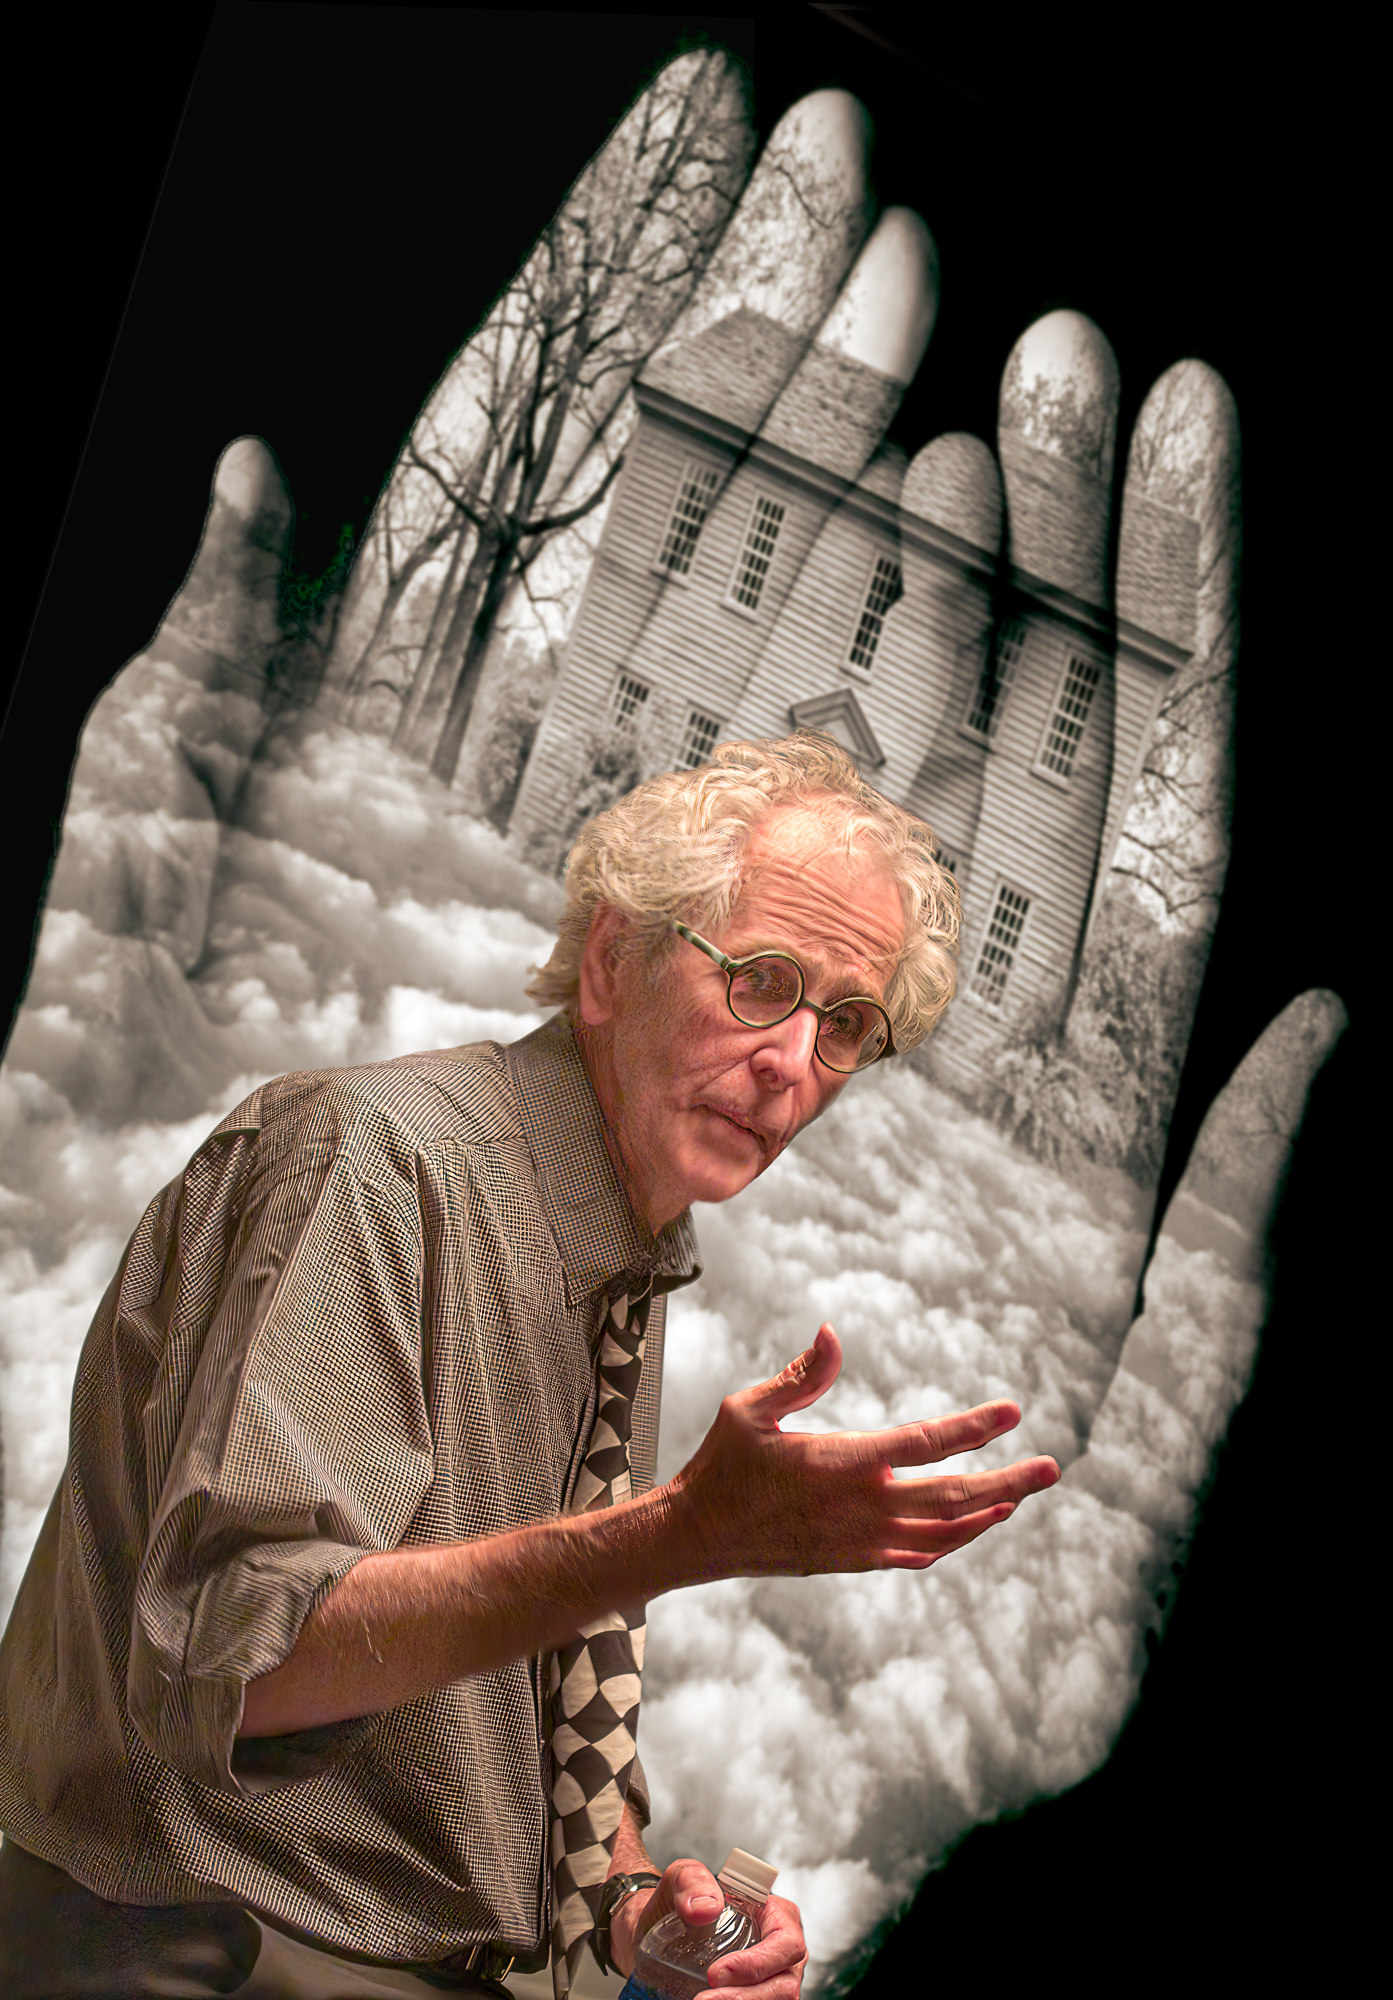
Perhaps it was time to revisit my 2005 raw captures of Jerry… and maybe consider a composite-tribute to this legend.
To accomplish this vision, using a Non-Destructive workflow, I adjusted the general exposure and color temperature in my non-destructive camera raw software. I then opened the adjusted raw-processed file as a “Smart Object” in Photoshop to preserve the original data captured 16 years earlier!
To resolve noise issues from old-sensor technology and low light conditions, I used Topaz DeNoise AI. To address the motion-blur caused by slow shutter speeds, I used Topaz Sharpen AI. I applied both of these Photoshop plug-ins as “Smart Filters”.
Using “Smart Filters” on “Smart Objects” applies algorithms to the ones and zeros of the raw captured data.
This preserved the original-captured data… maintaining a “Non-Destructive” workflow.


(Swipe LEFT to see original raw captures / Swipe RIGHT to see Sharpen and Noise Reduction)
With the advantages of a “Non-Destructive” Optimum Digital Process Workflow: I was able to take advantage of:
…..> improved software algorithms, and
…..> personal growth of my processing skills
to create a composite image, I post-visualized 15 years ago:
… my portrait of Jerry with hand gesture “layered” in Photoshop in front of a projection of his signature “hands” image “She Walks Softly”.
A Sad Note: While preparing this article, Jerry Uelsmann passed away at 87 years old. I encourage you to Google his legendary and inspiring photos.
Example 2: Printing a Highly-Cropped File
A recent noteworthy advancement has been Adobe Camera Raw’s Enhanced – Super Resolution feature. This algorithm increases a file’s raw data resolution 4 times (2x horizontal and 2x vertical). The 4x is NOT 4x the pixels but 4x the raw capture data – a totally non-destructive upscale!
Below are the non-destructive steps used to create a 21 x 17-inch print from a highly-cropped image captured by Terry Stoa©.
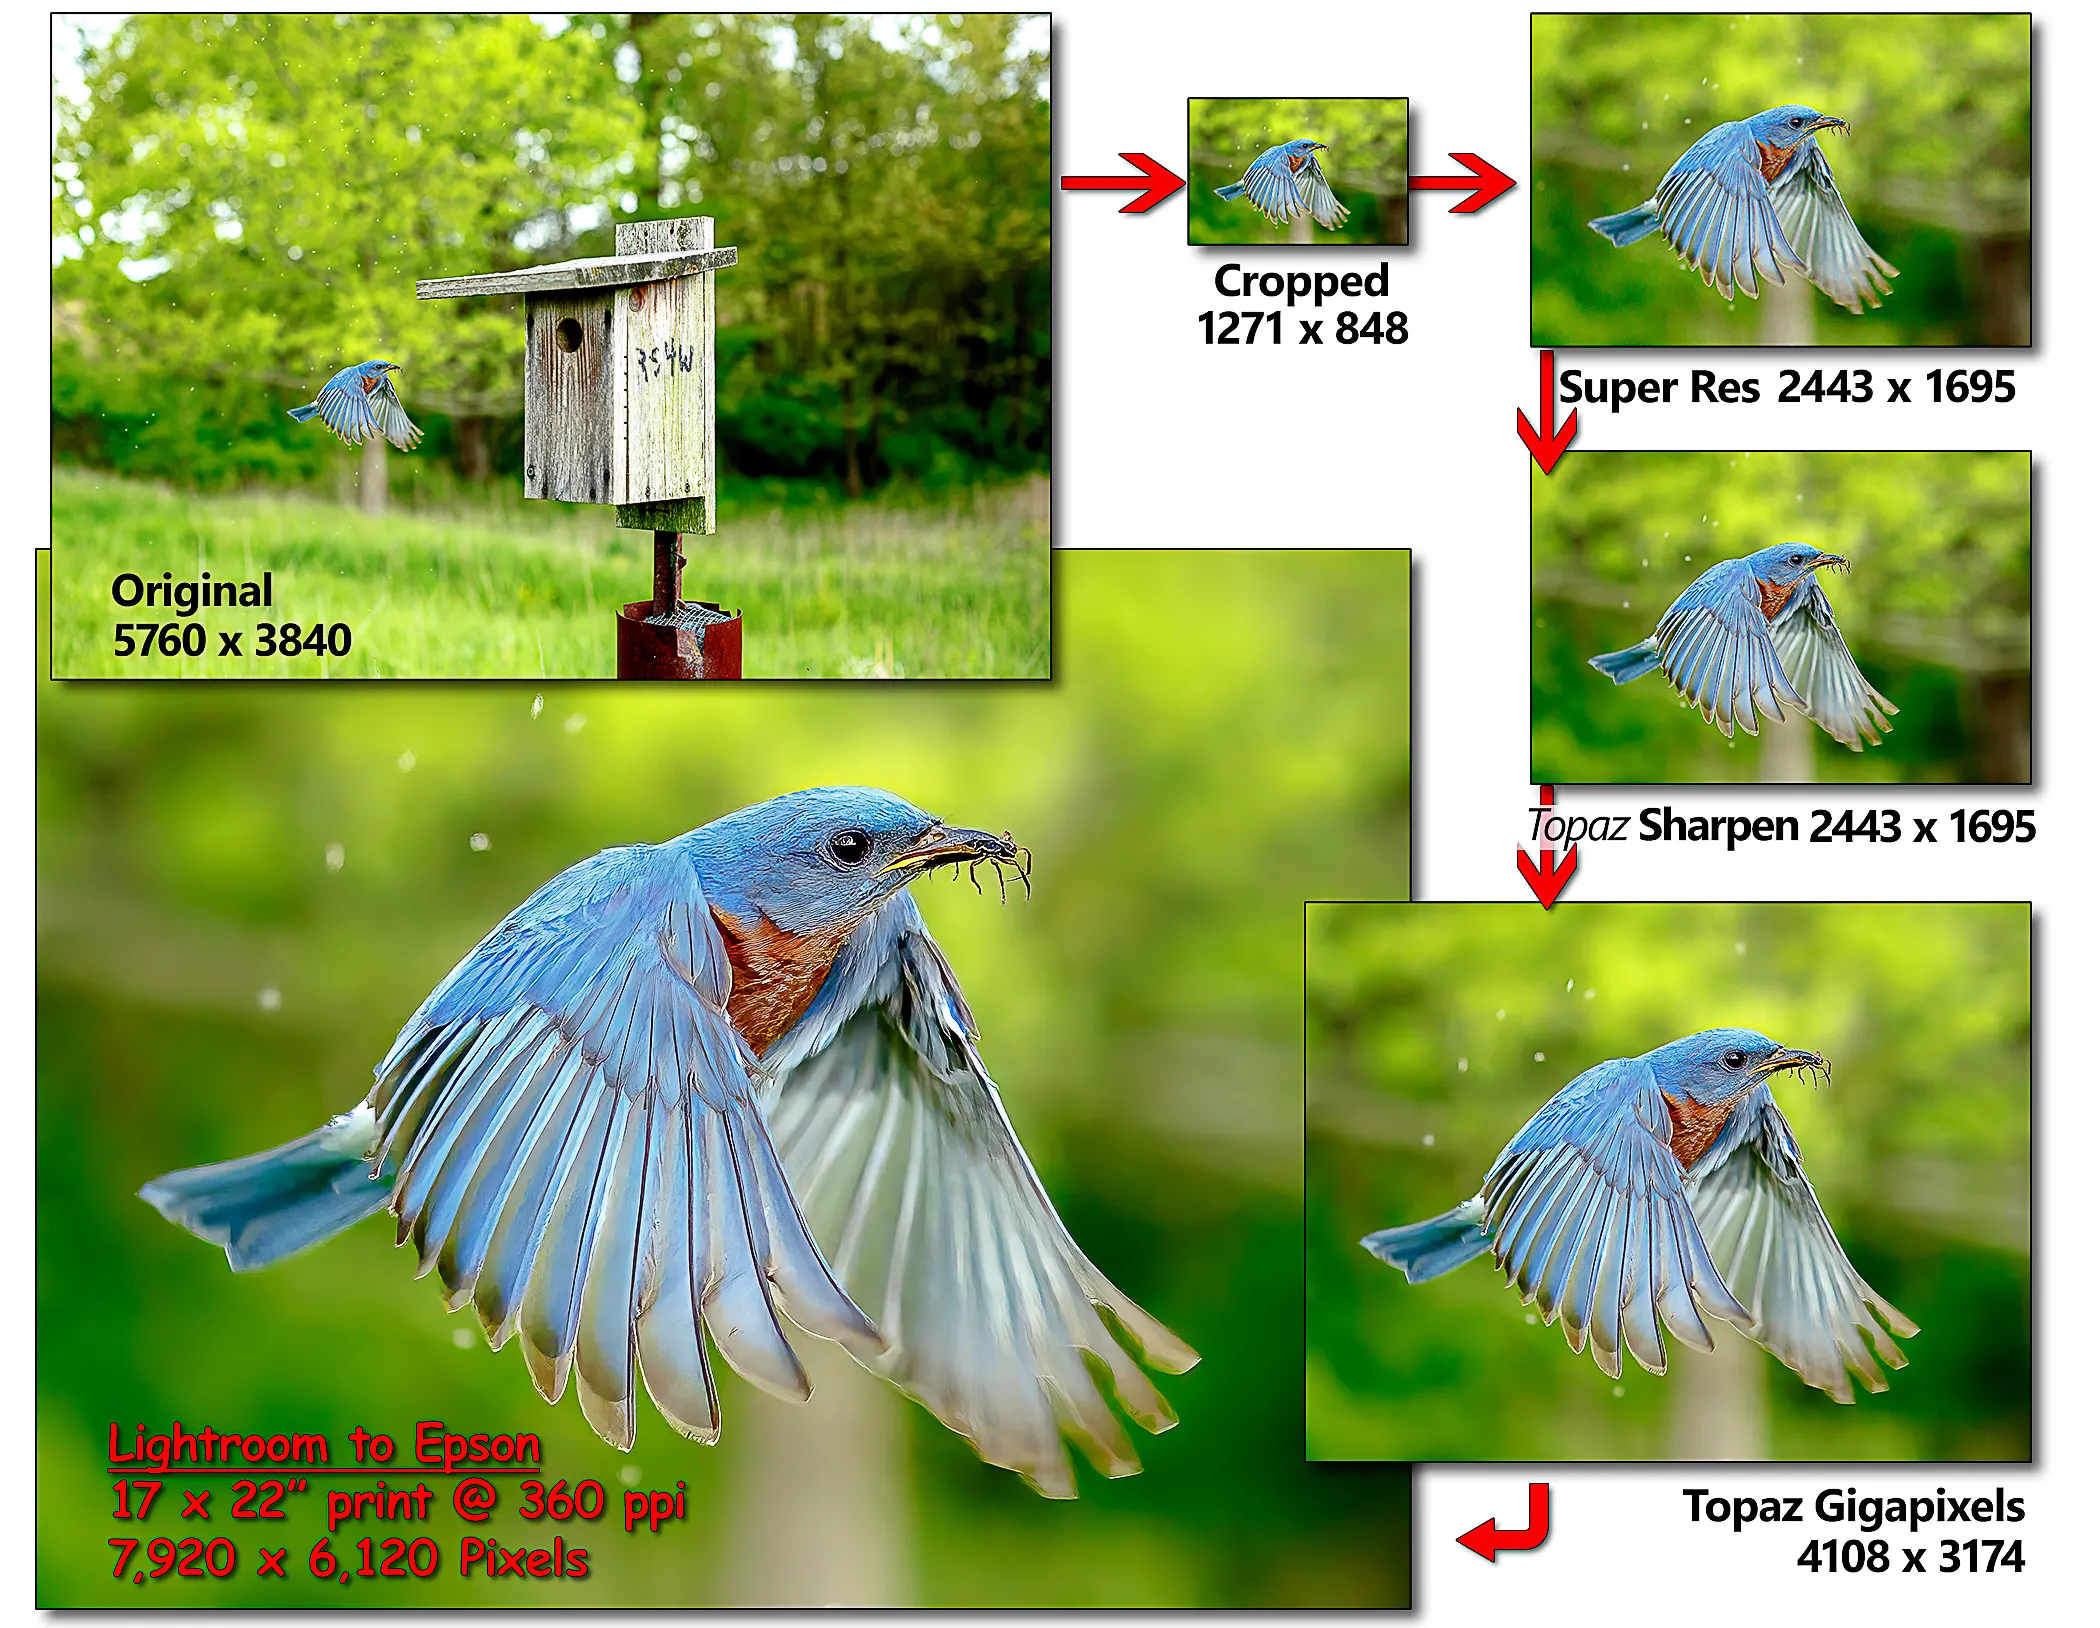
2. Used Adobe’s Enhanced-Super Resolution to increase cropped data 4x creating a 2443 x 1695 pixel or 4MP file – of raw data!
3. Opened this Enhanced Resolution raw file from LR into PS as |
~~a “Smart Object” and used Topaz Labs SharpenAI as a “Smart Filter” to sharpen the image – this non-destructive editing
~~preserved the original digital raw capture data.
4. I then saved the file creating a PS-Layered TIF file. (I refer to these PS-layered files as my “Enhanced Master” [EM].)
Outputting A “Non-Destructive” File
What Is A “Digital Print?
To quote from Karl Lang’s “Rendering the Print: the Art of Photography” when defining “the print”:
~~“Today, assume the words “the print” to mean any final rendering of a photograph for its selected display medium…
~~~an actual print on paper, a web page, image on a cell phone or projected on a wall.”
Preparing the Non-Destructive File for 22 x 17-inch Print
~~ Only when finally output “to print”, is this non-destructive file “rasterized” into pixels! ~~
5. To prepare this “Enhanced Master” EM file for printing, I used Topaz Labs’ GigapixelAI to rasterize the file 2x larger –
~~creating a 4108 x 3174 pixel or 13MP file.
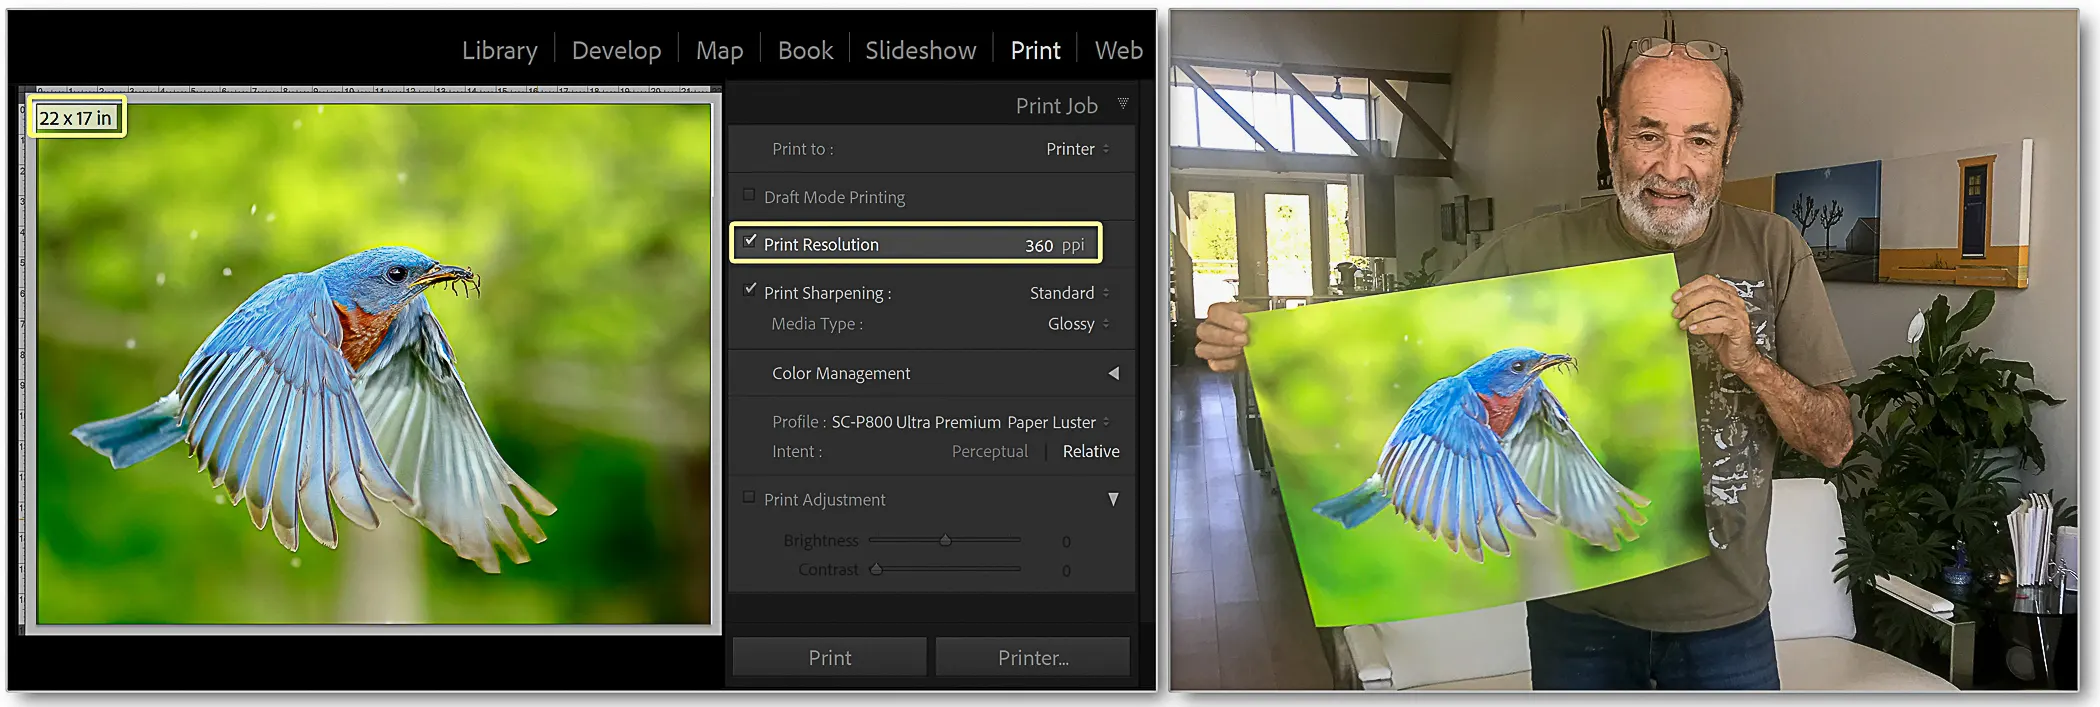
6. I then output this 13MP file to print using Lightroom’s Print module. The printing parameters were set to 22 x 17” x 360ppi*
~~creating a 7920 x 6120 pixel or a 33.6MP rasterized file. (* 360ppi is Epson’s native resolution).
~Note: Lightroom’s algorithms intelligently scaled this file with considerations for upscaling, paper surface, and viewing distance.
In Summary:
• A 22-Megapixel raw capture file cropped to 1MP file
• The 1MP file was Enhanced 4x to a 4MP file of raw data
• The 4MP file was rasterized to a 13MP file using scaling software, and finally
• Intelligent “output” software resized the 13MP file to a 33.6MP file for print!
Conclusion
As demonstrated in the above two examples:
~~~…a “soft & noisy” raw capture… output to a 1920 x 1080 pixel file for social media
~~~…a “highly-cropped” raw capture… output to a 22 x 17-inch paper print
…Both examples utilizing non-destructive processing only available to the digital “Photographer/ Processor” !
~~ The Future Is Limitless And Impossible To Predict ~~
With the Craft & Creative advantages of Non-Destructive processing, it is time for you to consider
using an “Optimized Digital Processing Workflow” to achieve your “Artistic Vision”.
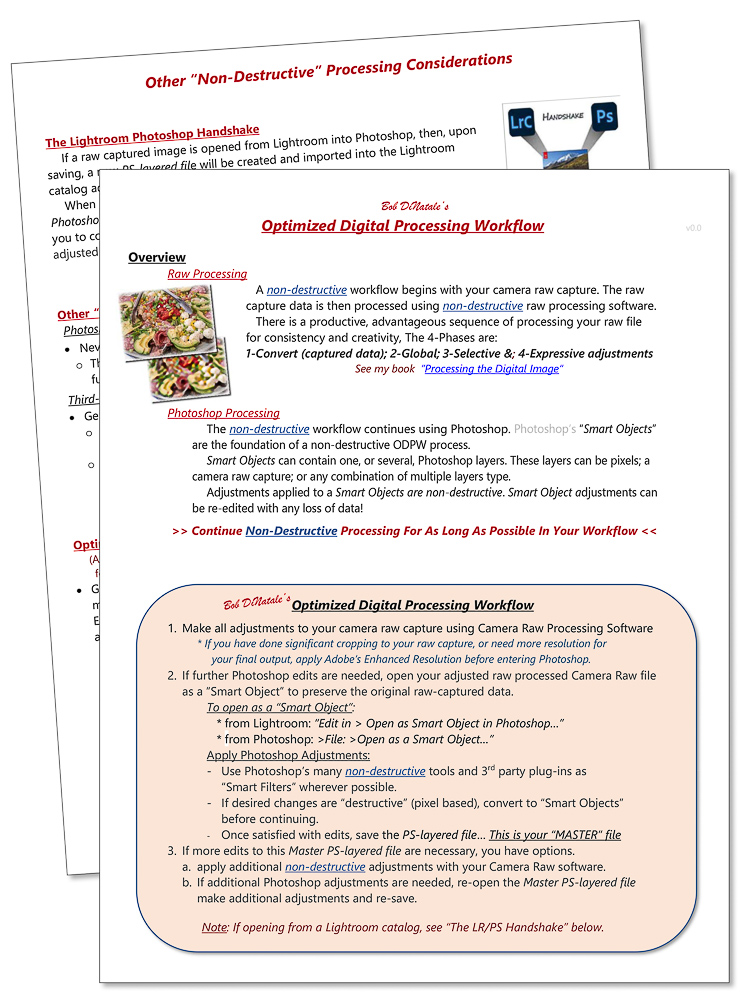
Free Download of my “Optimum Digital Processing Workflow”
For a step-by-step procedure and other “Non-Destructive” processing considerations
[Click Here]
