Print Your Image With a Drop Shadow in Lightroom
Under-laying Graphic files in LR
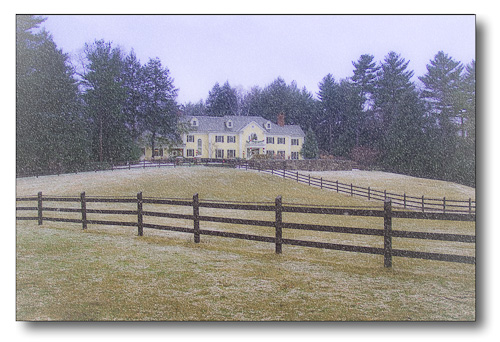
We will use a technique similar to that in the 1st post but instead of printing a solid color graphic background, we will use a soft edge black layer saved as a PNG to preserve the transparency in the drop-shadow.
You can lessen the drop-shadow effect by decreasing its opacity when printing in LR. You can also scale the drop-shadow in LR but scaling can only be done proportionally (no stretching or pulling). That means you will have to make a different “Drop-Shadow” file for each different print aspect ratio or print shape. I have included 2 standard-sized “Drop-Shadow” files below: a 6″ x 9″ (1:1.5) and a 6″ x 8″ (1:1.33). Simply hover over the file and right mouse click to save the file(s) to your desktop. These files can be used over a wide range of print sizes with the same print aspect ratio.


*At the end of this post, I will go thru the Photoshop steps needed to create the Drop-Shadow file.
Creating a Print Template for your Drop-Shadow Printing
{Before printing with a drop shadow in LR, we need to have a soft-edge PNG file. You could save one of the files above or you’ll need to create one using the instructions at the end of this post. For this example I will use the DS06x09.png above.}
On the left side of LR’s “Print” module in the “Template Browser” panel:
- click on the “+” to create a new template and name it ” DS06x09″.
The “Print” module’s right panels we need to address are:
- “Image Settings”: Check “Stroke Border”, Check “Zoom to fill”; (great when the file ratio is different than the cell ratio.)
- “Layout”: Set all “margins” to “0”; Rows & Columns to “1” and enter “Cell Size”: Height = 6, Width = 9 (At this point I would hover over the “DS06x09” template and right mouse click to “Update with current settings”. I do this often during template creation.)
- “Overlay”:
- Check “Identity Plate”
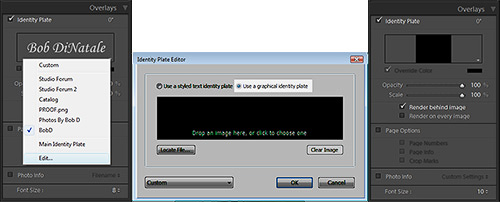
- Click on the down triangle in box to reveal choices (if you made any)
- Click “Edit”
- In the “Identity Plate Editor”, select the “Use a graphical identity plate” button and locate the “DS06x09.png” file (probably downloaded on your desktop)
- Size the Drop-Shadow graphic so the hard-edge rectangle covers the image. (rotate 90 degrees if necessary for verticals)
- Check “Render behind image”
- Adjust “Opacity” to taste.
Again, hover over the “DS06x09” template and right mouse click and “Update with current settings”. You can now reuse this Print template to produce drop shadow printing.
That’s It…Now, if the question is, “Can I print with an overlay AND an Underlay?”–the answer is “NO!“
*Creating Drop-Shadow Graphic in Photoshop
1. Create a file with a transparent background (the size of your print area, not paper size) at 300 ppi. Fill layer with black.
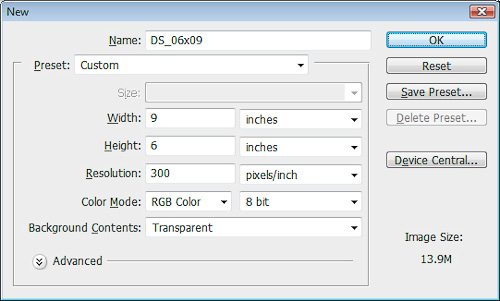
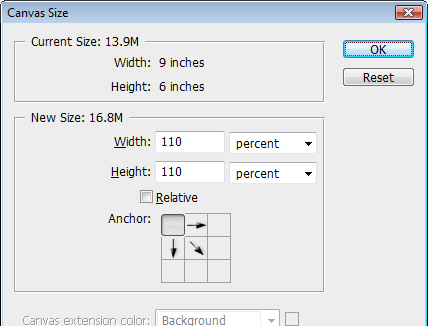
2. Increase the canvas size 110% from the top left corner.
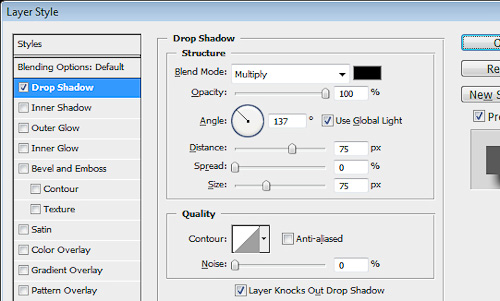
3. Add Drop Shadow effect 75 x 75 and set the opacity of the drop-shadow to 100%.
4. Save your Drop-Shadow file as a “.png” to maintain the transparency needed for the overlay.


